What are concept maps?
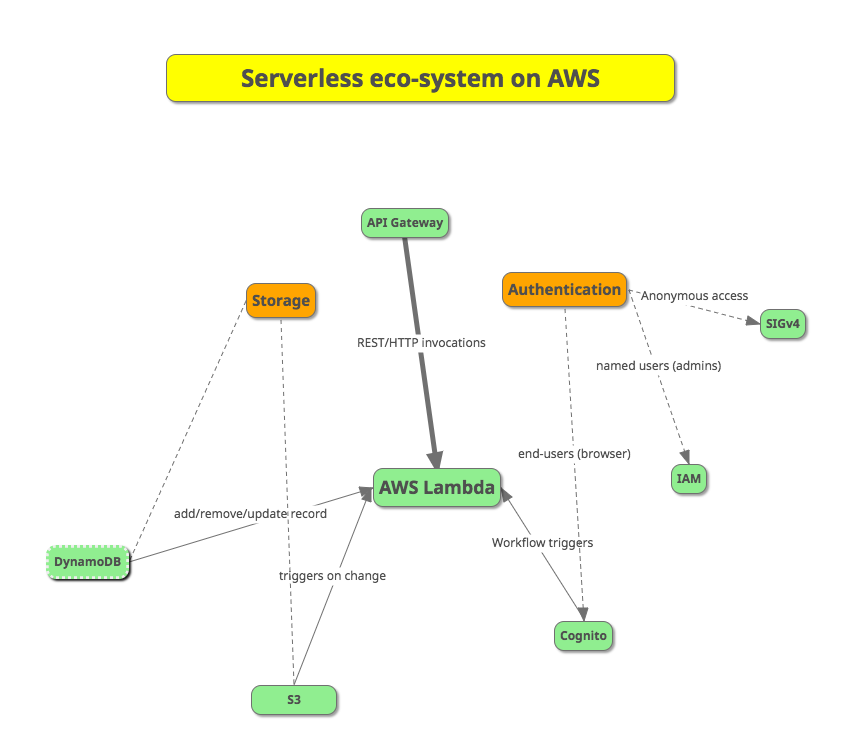
A concept map, or a conceptual diagram, is a visualisation of relationships between a group of ideas. Concept maps are structurally similar to mind maps, but instead of conveying meaning through hierarchies and relative position, concepts are depicted with directional links, notes and attributes. Concept maps are useful to visualise knowledge graphs, explain relationships between components, and illustrate flows and structural dependencies.
How MindMup makes concept mapping easy
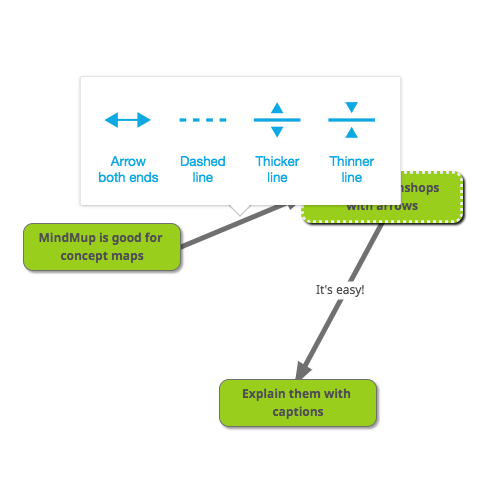
MindMup supports several ways of visualising relationships attributes, such as depicting the strength of connections with line styles (dashed or solid), directions with arrows, explaining relationships through captions on lines, showing similarity of concepts and relationships by using colours and visualising relative importance of concepts with different letter sizes.
MindMup also provides powerful keyboard shortcuts for adding nodes and connections, so you can work more productively.
Key tips for creating concept maps with MindMup
The most important difference between concept maps and ordinary mind maps is that there is no implied structural hierarchy. Rather than creating parent nodes and child nodes, with concept maps each idea is an independent box on the screen. Instead of hierarchical relationships, the lines between nodes represent direction, aggregation and flow.
Adding concepts to the map
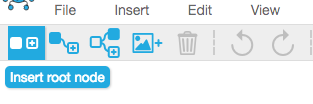
Independent nodes are, in the MindMup application, called Root Nodes. To add a new independent node to a map, instead of the typical tools to add children or parents, use the Insert root node tool from the toolbar.
You can also use the main application menu Insert > Root Node or press Ctrl+D on the keyboard to quickly add a root node. One more keyboard shortcut worth remembering is that pressing Enter while a root node is selected adds another root node. So if you always add new nodes with the Enter key, they will all be independent.
If you already added a child or a parent node to something, starting to create a typical mind map, you can disconnect them by selecting the child node and selecting Edit > Disconnect node from the main application menu. You can achieve the same by pressing the D key on the keyboard (remember D for disconnect).
Positioning nodes
MindMup tries to be helpful and automatically lay out nodes for a typical mind map, but this is not helpful for concept mapping. When you create independent nodes as explained above, you are completely in control of the layout and positioning, so you can just drag and drop nodes to any position you like, as long as they do not overlap.
Showing relationships
Concept maps show more complex relationships than a typical mind map does, so rather than inserting automatic links between parent and child nodes, users typically want more control when concept mapping. MindMup does not add any automatic links between root nodes – you can add relationships easily.
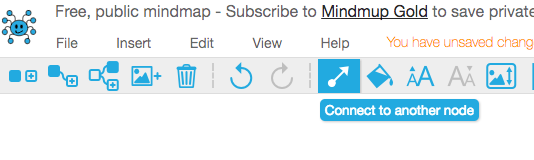
First select the node where the link will start (the origin of the relationship). Click on the Connect to another node tool in the toolbar, and then click on the node where the link should end (the destination of the relationship).
Instead of the toolbar, you can also use Edit > Connect to another Node from the main application menu.
For quick access and adding relationships between a node and several other nodes, select the start node, then hold the Alt key, and click on the destinations.
Managing relationship attributes
To change the style of a connection (including arrow positions, line thickness or type), just click on the line. A menu will pop up enabling you to put a caption on a line or change the line properties.
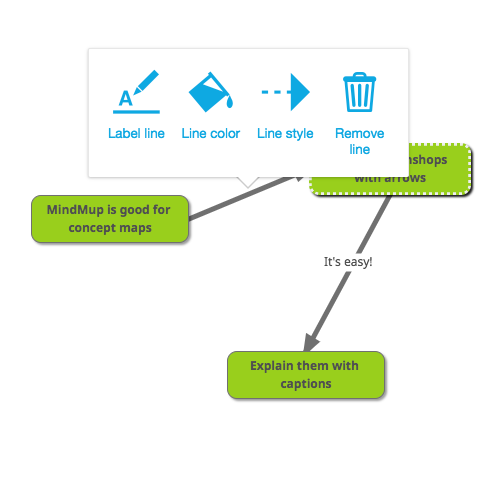
Click the Line style button to open a submenu with arrow and line options. Tap on the arrow button to change the arrow direction, or to set arrows on both ends.
To remove the arrow from the line, just keep tapping the arrow options until the option for removing appears.
Removing relationships
To remove a relationship, just click or tap the line, and select Remove line from the pop-up menu.
You can also remove a relationship by selecting the start, holding Alt and clicking on the end node. This makes it also easy to remove a group of relationships quickly.
Signaling importance
You can easily show the relative importance of concepts or relationships by increasing the size of the text or the thickness of the lines.
To make a node use larger letters, just select the node and click on the Larger node font tool in the toolbar.
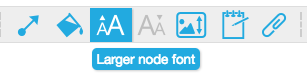
You can also select Edit > Node Font > Larger from the main application menu, or tap the T key on the keyboard (remember T for Text). To reduce the font, use Shift+T on the keyboard, and Alt+T to set a node back to its original size.
You can set the line thickness by clicking on the line, choosing Line style, and clicking on the Thicker line or Thinner line buttons in the pop-up menu.